How to Read 1 Button Click Arduino
Arduino - Push button - Long Press Brusque Press
We will larn:
-
How to discover the button's short press
-
How to notice the button'southward long press
-
How to detect both the button's long press and short printing
-
Long press and short press with debouncing
In the get-go three parts, we learn how to detect in principle.
In the last part, nosotros learn how to detect in practical use by applying the debounce. See why practice nosotros need to debounce for push. Without debouncing, nosotros may discover wrong the button short press.
| 1 | × | Arduino UNO or Genuino UNO | |
| i | × | USB ii.0 cable type A/B | |
| 1 | × | Button | |
| 1 | × | Breadboard | |
| north | × | Jumper Wires |
Please note: These are affiliate links. If you lot buy the components through these links, Nosotros may become a committee at no extra price to you. Nosotros appreciate it.
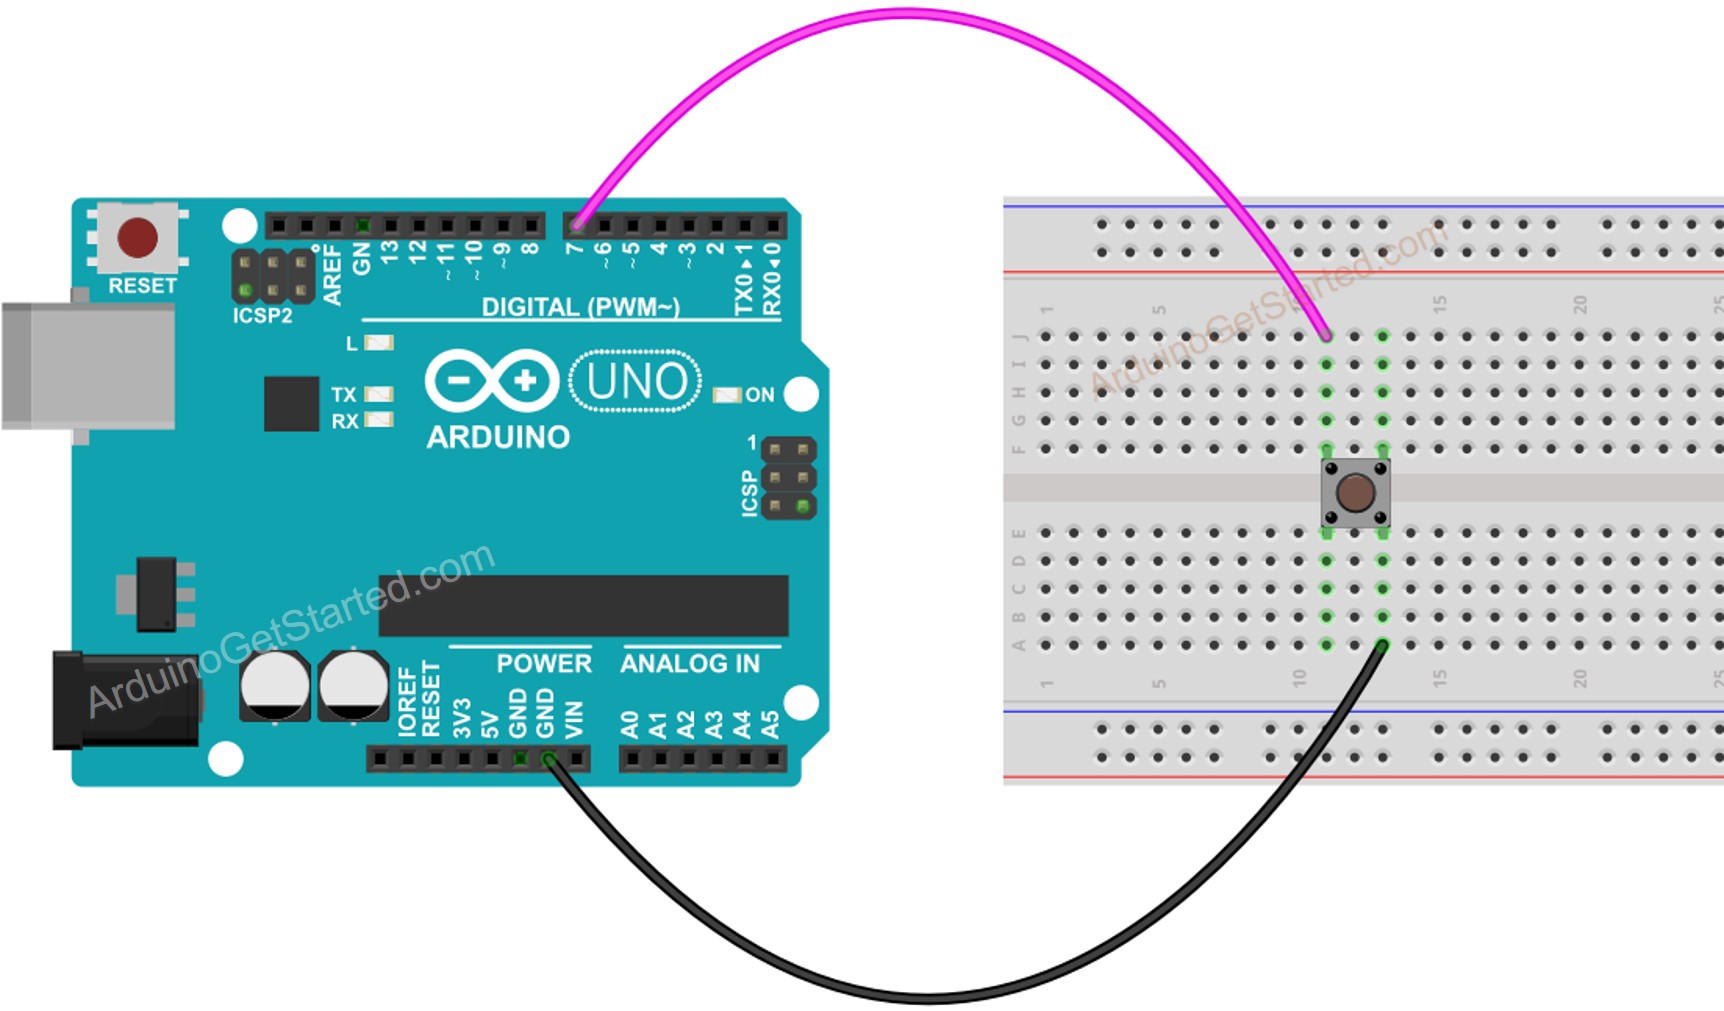
Epitome is developed using Fritzing. Click to enlarge image
In this tutorial, we will apply the internal pull-up resistor. Therefore, the state of the button is HIGH when normal and Low when pressed.
We mensurate the time duration between the pressed and released events. If the duration is shorter than a defined time, the brusque press event is detected.
Let's run across step by step:
-
Ascertain how long the maximum of short press lasts
const int SHORT_PRESS_TIME = 500;
-
Discover the push is pressed and save the pressed fourth dimension
if(lastState == HIGH && currentState == Low) pressedTime = millis();
-
Discover the button is released and save the released time
if(lastState == LOW && currentState == HIGH) releasedTime = millis();
-
Calculate press elapsing and
long pressDuration = releasedTime - pressedTime;
-
Determine the short printing by comparison the press elapsing with the divers short press fourth dimension.
if( pressDuration < SHORT_PRESS_TIME ) Serial.println("A short printing is detected");
const int BUTTON_PIN = vii; const int SHORT_PRESS_TIME = 500; int lastState = Depression; int currentState; unsigned long pressedTime = 0; unsigned long releasedTime = 0; void setup() { Serial.brainstorm(9600); pinMode(BUTTON_PIN, INPUT_PULLUP); } void loop() { currentState = digitalRead(BUTTON_PIN); if(lastState == High && currentState == Depression) pressedTime = millis(); else if(lastState == Low && currentState == HIGH) { releasedTime = millis(); long pressDuration = releasedTime - pressedTime; if( pressDuration < SHORT_PRESS_TIME ) Serial.println("A short press is detected"); } lastState = currentState; }
-
Upload the above code to Arduino via Arduino IDE
-
Press the button shortly several times.
-
Come across the result on Serial Monitor
A short press is detected
※ Annotation THAT:
The Serial Monitor may show several short press detection for one press. This is the normal beliefs of the button. This behavior is chosen the "chattering phenomenon". The issue will exist solved in the final part of this tutorial.
In that location are ii apply cases for detecting the long press.
-
The long-press result is detected correct after the push is released
-
The long-printing event is detected during the fourth dimension the button is being pressed, even the button is non released yet.
In the first use case, We measure the time elapsing between the pressed and released events. If the elapsing is longer than a defined time, the long-press event is detected.
In the 2d use case, After the button is pressed, We continuously measure the pressing time and cheque the long-printing event until the button is released. During the time button is being pressed. If the duration is longer than a defined fourth dimension, the long-press event is detected.
const int BUTTON_PIN = seven; const int LONG_PRESS_TIME = chiliad; int lastState = Low; int currentState; unsigned long pressedTime = 0; unsigned long releasedTime = 0; void setup() { Serial.begin(9600); pinMode(BUTTON_PIN, INPUT_PULLUP); } void loop() { currentState = digitalRead(BUTTON_PIN); if(lastState == HIGH && currentState == LOW) pressedTime = millis(); else if(lastState == Depression && currentState == HIGH) { releasedTime = millis(); long pressDuration = releasedTime - pressedTime; if( pressDuration > LONG_PRESS_TIME ) Serial.println("A long printing is detected"); } lastState = currentState; }
-
Upload the higher up lawmaking to Arduino via Arduino IDE
-
Press and release the push after one 2d.
-
See the result on Series Monitor
The long-printing event is only detected correct afterwards the button is released
const int BUTTON_PIN = 7; const int LONG_PRESS_TIME = yard; int lastState = LOW; int currentState; unsigned long pressedTime = 0; bool isPressing = fake; bool isLongDetected = false; void setup() { Serial.brainstorm(9600); pinMode(BUTTON_PIN, INPUT_PULLUP); } void loop() { currentState = digitalRead(BUTTON_PIN); if(lastState == High && currentState == Depression) { pressedTime = millis(); isPressing = true; isLongDetected = simulated; } else if(lastState == Depression && currentState == HIGH) { isPressing = false; } if(isPressing == true && isLongDetected == false) { long pressDuration = millis() - pressedTime; if( pressDuration > LONG_PRESS_TIME ) { Series.println("A long press is detected"); isLongDetected = true; } } lastState = currentState; }
-
Upload the to a higher place lawmaking to Arduino via Arduino IDE
-
Printing and release the push afterwards several seconds.
-
Encounter the result on Serial Monitor
The long-press effect is only detected when the button is not released nonetheless
const int BUTTON_PIN = 7; const int SHORT_PRESS_TIME = chiliad; const int LONG_PRESS_TIME = 1000; int lastState = Depression; int currentState; unsigned long pressedTime = 0; unsigned long releasedTime = 0; void setup() { Serial.begin(9600); pinMode(BUTTON_PIN, INPUT_PULLUP); } void loop() { currentState = digitalRead(BUTTON_PIN); if(lastState == Loftier && currentState == LOW) pressedTime = millis(); else if(lastState == Low && currentState == High) { releasedTime = millis(); long pressDuration = releasedTime - pressedTime; if( pressDuration < SHORT_PRESS_TIME ) Series.println("A short printing is detected"); if( pressDuration > LONG_PRESS_TIME ) Serial.println("A long press is detected"); } lastState = currentState; }
-
Upload the above code to Arduino via Arduino IDE
-
Long and curt press the push button.
-
See the result on Serial Monitor
※ Note THAT:
The Serial Monitor may show several short press detection when long press. This is the normal behavior of the push button. This behavior is called the "chattering miracle". The issue will be solved in the last role of this tutorial.
const int BUTTON_PIN = 7; const int SHORT_PRESS_TIME = yard; const int LONG_PRESS_TIME = thousand; int lastState = LOW; int currentState; unsigned long pressedTime = 0; unsigned long releasedTime = 0; bool isPressing = imitation; bool isLongDetected = false; void setup() { Serial.begin(9600); pinMode(BUTTON_PIN, INPUT_PULLUP); } void loop() { currentState = digitalRead(BUTTON_PIN); if(lastState == High && currentState == LOW) { pressedTime = millis(); isPressing = true; isLongDetected = false; } else if(lastState == LOW && currentState == Loftier) { isPressing = false; releasedTime = millis(); long pressDuration = releasedTime - pressedTime; if( pressDuration < SHORT_PRESS_TIME ) Serial.println("A short printing is detected"); } if(isPressing == true && isLongDetected == simulated) { long pressDuration = millis() - pressedTime; if( pressDuration > LONG_PRESS_TIME ) { Serial.println("A long press is detected"); isLongDetected = true; } } lastState = currentState; }
-
Upload the above code to Arduino via Arduino IDE
-
Long and short press the button.
-
See the upshot on Serial Monitor
※ NOTE THAT:
The Series Monitor may prove several short press detection when long press. This is the normal behavior of the button. This beliefs is called the "chattering phenomenon". The consequence will be solved in the last part of this tutorial.
Information technology is very of import to debounce the button in many applications.
Debouncing is a little complicated, especially when using multiple buttons. To make information technology much easier for beginners, we created a library, called ezButton.
Nosotros will utilise this library in below codes
#include <ezButton.h> const int SHORT_PRESS_TIME = grand; const int LONG_PRESS_TIME = 1000; ezButton button(7); unsigned long pressedTime = 0; unsigned long releasedTime = 0; void setup() { Series.brainstorm(9600); button.setDebounceTime(fifty); } void loop() { button.loop(); if(push button.isPressed()) pressedTime = millis(); if(push.isReleased()) { releasedTime = millis(); long pressDuration = releasedTime - pressedTime; if( pressDuration < SHORT_PRESS_TIME ) Serial.println("A brusk press is detected"); if( pressDuration > LONG_PRESS_TIME ) Serial.println("A long press is detected"); } }
-
Install ezButton library. See How To
-
Upload the higher up lawmaking to Arduino via Arduino IDE
-
Long and short press the button.
-
See the result on Series Monitor
#include <ezButton.h> const int SHORT_PRESS_TIME = 1000; const int LONG_PRESS_TIME = one thousand; ezButton push(seven); unsigned long pressedTime = 0; unsigned long releasedTime = 0; bool isPressing = false; bool isLongDetected = false; void setup() { Series.brainstorm(9600); button.setDebounceTime(l); } void loop() { button.loop(); if(button.isPressed()){ pressedTime = millis(); isPressing = truthful; isLongDetected = false; } if(button.isReleased()) { isPressing = false; releasedTime = millis(); long pressDuration = releasedTime - pressedTime; if( pressDuration < SHORT_PRESS_TIME ) Serial.println("A curt press is detected"); } if(isPressing == truthful && isLongDetected == false) { long pressDuration = millis() - pressedTime; if( pressDuration > LONG_PRESS_TIME ) { Series.println("A long press is detected"); isLongDetected = true; } } }
-
Install ezButton library. See How To
-
Upload the in a higher place code to Arduino via Arduino IDE
-
Long and short printing the push.
-
Meet the issue on Serial Monitor
We are considering to make the video tutorials. If you recollect the video tutorials are essential, please subscribe to our YouTube aqueduct to give us motivation for making the videos.
-
To relieve the number of buttons. A single button can keep two or more functionalities. For example, brusk press for changing performance mode, long press for turn off the device.
-
Use of long press to reduce the short press past accident. For example, some kinds of devices use the button for factory reset. If the button is pressed by accident, it is dangerous. To avert information technology, the device is implemented to exist factory reset only when the push button is long-printing (east.grand over 5 seconds)
Follow Us
shepherdthallactle.blogspot.com
Source: https://arduinogetstarted.com/tutorials/arduino-button-long-press-short-press
0 Response to "How to Read 1 Button Click Arduino"
Postar um comentário